| .forgejo/workflows | ||
| pics | ||
| src | ||
| .gitignore | ||
| .woodpecker.yml | ||
| LICENSE | ||
| Makefile | ||
| README.md | ||
Commodore CBM 3001 Memtest
Memtest for the Commodore PET 2001 / CBM 3001 series
This is a memtest routine written in MOS 6502 assembly. Its purpose is to detect faulty RAM in Commodore PET 2001 / CBM 3001 computers.
In order to test the entire memory range, this routine must be
executed directly when the CPU resets, i.e. if loaded e.g. via a BASIC
SYS command, it will overwrite memory used by the BASIC interpreter
and KERNAL, leading to undefined behaviour.
Instead, the test routine should be flashed to an ((E)E)PROM, which
can then be inserted in the ROM socket mapped to $F000:$FFFF (the
one which normally holds the KERNAL code).
The test routine only uses the 7 first bytes of memory to store its
state, the entire remaining memory range starting at $0007 can be
tested. The memory is tested in multiple passes, using different
patterns.
USE AT YOUR OWN RISK
Getting Started
- Install the xa65 toolchain.
- Clone this repository.
- Run
make. This will produce (among other) the following files in theout/directory:memtest*k-f000.901465.bin: 4K, 8K, 16K and 32K variants of the binary you'll later flash to an ((E)E)PROM.memtest4k-f000-ascii.emu6502.bin: The same code, but text is rendered as ASCII instead of PETSCII. Used by the emulator.emu6502: A MOS 6502 emulator for testing.
Testing in the Emulator
The emulator uses Fake6502 to emulate the MOS 6502 CPU. The following memory regions are mapped into the emulator's address space, compatible with the PET 2001 / CBM 3001 memory map:
$0000:$0fff: RAM with simulated failures (4K only for faster testing)$8000:$8fff: Video buffer, printed to stdout after each instruction$f000:$ffff: Thememtest-f000.901465+ascii.binROM
Run out/emu6502.
Run on a Real PET / CBM
- Figure out how much memory your device has. Choose the appropriate image (
memtest4k,memtest8k,memtest16kormemtest32k). - Flash the
out/memtest*k-f000.901465.binimage to a ((E)E)PROM compatible to the MOS 901465 ROM chip.- Most parallel ROMs of at least 4KiB should be usable, just short the excess uppermost address pins to GND and ensure pin compatibility, e.g. through an adapter PCB.
- Remove the KERNAL ROM (the one mapped to
$f000:$ffff) from your PET / CBM. - Place the memtest ROM into the same socket.
- Power up the computer. It should immediately start testing the memory.
- In case there are too many memory errors and they are already overwritten on screen before you can analyze them, you can trigger a hardware NMI, which will stop the memtest routine. Though afterwards you'll have to start over by triggering a reset.
Output Interpretation
After starting up, most of the screen will be empty.
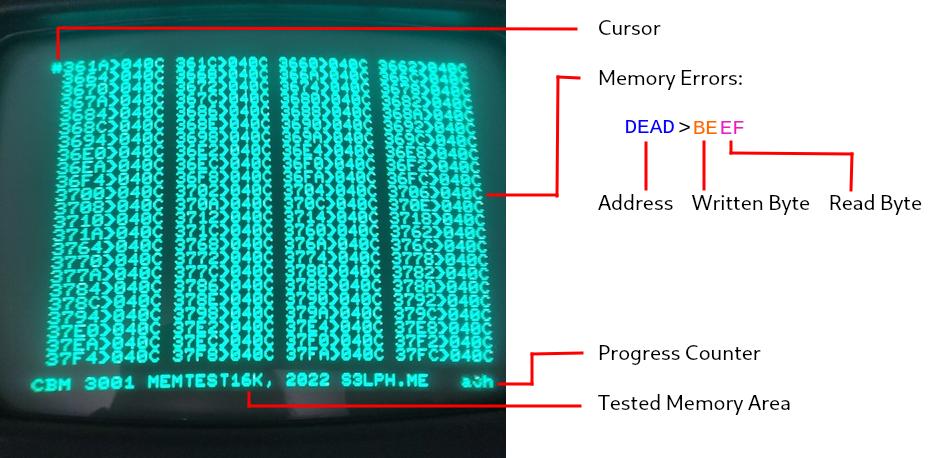
- In the top left you can see a
#character. This is the cursor. If more defects are found than fit on the screen, the output will start over at the top, overwriting previous entries. The cursor indicates the position after the last printed output. - Each faulty memory access looks like this:
DEAD>BEEF.- The part left of the
>sign is the memory address at which the fault occured. - The part right of the
>sign is two bytes: First the byte that was written to this address, then the byte that was returned when reading from the same address. - If the delimiter is
Xinstead of>, the byte that was written is the XOR of the high and low bytes of the address, i.e.(DE xor AD). If you only seeXfaults, there may be a fault in the address lines, rather than individual memory cells or output lines.
- The part left of the
- In the bottom right you can see 3 quickly alternating characters. The first two chars are the textual (PETSCII characters, not hexdumped) representation of the memory address currently being tested. The third char is the character written to said memory address in the current pass.
- When all memtest passes have completed, there will be an additional
=character left of these chars. - When the memtest routine was interrupted by an NMI, there will be a
!instead.
- When all memtest passes have completed, there will be an additional
- When the screen is not cleared (filled with random characters), and the first line starts with
ZF***ZF(*being other seemingly random characters), a fault in the first few bytes of the zero page were detected. Since the memtest uses this area to store its state, the test is terminated prematurely.- The three characters in between the two
ZFs are, from left to right, the zeropage address byte, the value written, the value read back.
- The three characters in between the two